The Whyte G160S we recently tested, is built with a Rock Shox Monarch R Debonair shock absorber. At first glance, it seems, maybe looks a bit too basic for this kind of bike. We like the idea of upgrading to the Rock Shox Monarch RL with a lock (made by the same company), which would stop the uphill rocking and would attract more new buyers, without an overly high price tag.
While uphill we noticed rocking, downhill wasn’t bad at all, and performed similar to its it doesn’t work bad at all, the same as its “colleague” the Rock Shox Yari. Both fulfill their role for the majority of endurance and mountain bike users. The only minor downside we noticed (so minor, it’s a simple €15 fix) was the lack of progressivity, which we verified since the very first climb, with an adjusted SAG at 30% and later at 25% with the same results.
We’ve put together a simple tutorial about how to fix the problem. For those who don’t dare to DIY, contact us and we’ll be glad to help!
1º st – Dismount the shock. In this case, the two screws for the Torx T25 are in the upper part and another 8mm and 10mm in the lower part.

2º nd – It’s very important to remove all the air from the shock. Don’t forget!!!

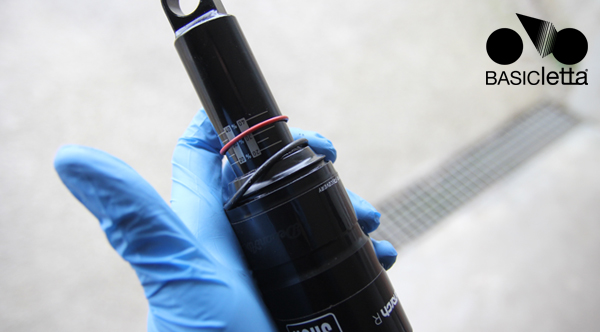
3rd – Remove the O-Ring that keeps the airlock Debonair in its place. It’s very simple to do, just apply pressure from the lower part until it hangs over the top, where you can easily pull it out. If you’re having trouble, you can use a hook (when using a hook, you risk damaging, the O-Ring, which will result in having to buy a new one).

4º th – After pulling you should have something like this. You just need to finish pulling and removing both the O-Ring and the red O-Ring of reference for the SAG.
5º th – You’ll then be left with something like this. The shock absorber has 2 exits, so we don’t need to degrease and clean it, we’ll just lubricate it a bit more at the end.

6th – Now let’s get the tokens, spacers and , O-Rings reducers and decide which ones we want to mount. The pack has 9 inside. Since, I weight 75kg and I want to have much more progressivity than usual, I’ll start with 6.

7th – We put it closer to the valve, careful not to put it close to the retainer because this is the other airlock and it wouldn’t work properly. We properly oil everything( the spacer and, the O-Rings) and then close it in the opposite way of how we did it at the beginning without forgetting the red O-Ring.

8th –To finish, we inflate it to the necessary pressure, mount the shock and make it work softly a few times to compensate the airlocks. the The pressure should go down to around 10 to 15 psi. We then place the air pump and give it the equivalent pressure. For my weight and way of handling, I’ll try160 psi.

We hoped this tutorial was useful to you! If you enjoyed this post, follow us in Facebook!
We offer this service for free with the purchase of any Whyte or Saracen bike with Rock Shox, which require an augmentation of the progressivity for the customer’s need. You can find many different models in our online shop and if you have any questions don’t hesitate to contact us.